Who are The Trusted House Painters in Toowoomba & The Darling Downs?

Looking for reliable house painters in Toowoomba or experienced house painters in the Darling Downs Region?

Paintway provide high-quality house painting services across Toowoomba, Highfields and the surrounding Darling Downs, helping homeowners transform their properties with beautiful, long-lasting finishes.

Whether you’re refreshing your home’s interior, updating its exterior, or preparing to sell, we’re committed to delivering workmanship you’ll be proud of Your Local Painting Specialists.

As local painting contractors, we understand the unique conditions that homes in Toowoomba experience. From the intense Queensland sun to changing weather conditions, using the correct preparation methods and premium paints is essential for a finish that lasts.

We’re proud to provide professional painting services throughout:

  • Toowoomba
  • Highfields
  • Middle Ridge
  • Rangeville
  • Kearneys Spring
  • Glenvale
  • Harristown
  • Wilsonton
  • Mount Lofty
  • East Toowoomba
  • South Toowoomba
  • Centenary Heights
  • Cotswold Hills
  • Kingsthorpe
  • Withcott
  • Meringandan
  • Cabarlah
  • Gowrie Junction
  • Blue Mountain Heights
  • A professionally painted interior can completely transform the feel of your home. Whether you’re renovating, building, or simply ready for a change, our experienced interior painters deliver clean lines, smooth finishes, and attention to every detail.

We paint:

  • Living rooms
  • Bedrooms
  • Kitchens
  • Bathrooms
  • Hallways
  • Ceilings
  • Feature walls
  • Home offices

From modern colour updates to complete home repaints, we’ll help you create spaces you’ll love spending time in.

Your home’s exterior creates the first impression and protects your investment from the elements. Paintway use premium products and proven preparation techniques to ensure your home looks fantastic for years to come.

Our exterior painting services include:

Brick homes

  • Rendered homes
  • Fence painting
  • Deck staining and painting
  • Pergolas
  • Garages
  • Eaves and fascias

A quality exterior paint job doesn’t just improve street appeal—it also protects your home from moisture, UV damage, peeling paint and everyday wear.

Why Choose Professional House Painters?

Painting is much more than applying colour to walls. The preparation is where quality workmanship begins.

Our process includes:

  • Thorough cleaning and preparation
  • Filling cracks and imperfections
  • Sanding surfaces
  • Protecting furniture and flooring
  • Premium primers and paints
  • Careful application for a flawless finish
  • Complete clean-up when the job is finished

It’s this attention to detail that delivers a professional finish built to last.

How Much Does House Painting Cost?

One of the questions we hear most often is, “How much does it cost to paint a house?”

The final cost depends on several factors, including:

  • The size of your home
  • Interior or exterior painting
  • Surface condition
  • Amount of preparation required
  • Paint products selected
  • Accessibility

We provide honest, obligation-free painting quotes, so you’ll know exactly what’s included before any work begins.

Why Homeowners Across Toowoomba Choose Us When you’re investing in your home, you deserve painters who genuinely care about the result.

Our customers choose us because we offer:

  • Friendly, reliable service
  • Premium quality paint products
  • Exceptional workmanship
  • Honest advice
  • Respect for your home
  • Clear communication from start to finish

We believe every project deserves the same level of care, whether we’re painting one bedroom or an entire home.

If you’re searching for trusted house painters in Toowoomba, reliable house painters in Highfields, experienced interior painters, or professional exterior house painters, we’d love to help.

We proudly provide house painting services throughout Toowoomba, Highfields and surrounding suburbs including Rangeville, Middle Ridge, Glenvale, Kearneys Spring, Wilsonton, Withcott, 
Transform Your Home with Expert House Painting in Toowoomba

Transform Your Home with Expert House Painting in Toowoomba

Are you looking to refresh your home’s appearance or add value to your property? A fresh coat of paint can make all the difference! Whether you’re planning to sell, renovate, or just brighten up your living space, professional house painting is the key to achieving a flawless finish.

Why Choose Professional House Painting?

Painting may seem like a simple DIY task, but achieving a professional look requires skill, the right tools, and high-quality materials. Here’s why hiring experienced painters in Toowoomba is a smart investment:

   •   Superior Finish: Professionals ensure even coverage, crisp lines, and long-lasting results.

   •   Time & Cost Efficiency: Avoid costly mistakes and wasted time with expert painters who get the job done right the first time.

   •   Quality Materials: We use premium paints and techniques suited to Toowoomba’s climate for durability and protection.

   •   Increased Property Value: A well-painted home enhances curb appeal and resale value.

Interior & Exterior Painting Services

We offer comprehensive painting services tailored to your needs, including:

   •   Interior Painting: Transform your walls, ceilings, and trims with fresh colors and modern finishes.

   •   Exterior Painting: Protect your home from the elements while boosting street appeal.

   •   Roof & Fence Painting: Extend the life of your roof and fencing with weather-resistant coatings.

   •   Commercial Painting: Give your business a fresh, professional look to attract more customers.

Choosing the Right Colors for Your Home

Selecting the perfect color scheme can be overwhelming. Our team can help you choose shades that complement your home’s style and surroundings. Popular choices in Toowoomba include:

   •   Neutral Tones: Whites, greys, and beiges for a timeless look.

   •   Earthy Hues: Warm browns, greens, and terracottas that blend with the natural landscape.

   •   Bold Accents: Deep blues, charcoals, or feature walls for a modern touch.

Get a Free Quote Today!

If your home needs a fresh coat of paint, don’t settle for anything less than professional results. Contact us today for a free consultation and quote. Let’s bring your vision to life with expert house painting in Toowoomba!

Is it worth repainting your home before Selling?

Are you planning to sell your home? If so, then you might be asking yourself if there are practical and cost-effective ways to boost its resale value. Read this guide to learn how refreshing your home’s paint can increase your home’s value.

Selling your old home is something does not happen straight away. Currently, on the market for 30 days before it is snapped up by a buyer. But this only applies to homes that are in the best locations and are in a good condition. Homes that are not in good condition, on the other hand, languish on the listings longer.

One of the first things prospective buyers consider is the home’s appearance. Indeed, first impressions last. And one of the first things they notice is the condition of your home’s paint, as well as its colour.

Check out why a simple repainting can increase your home value when it’s time to sell.

1. A fresh coat of paint can impress prospective buyers at first sight

Protect your painted walls

Put yourself in a prospective buyer’s shoes and imagine this. You pull up to a property for a showing or an open house, then you step out of the car to see the house in its full glory.

But then… Oh, no. You notice that the house’s exterior paint is chipped or faded. You enter the yard and notice that sagging has occurred in some areas. And that’s just the exterior. You enter the house and you immediately notice that the interior paint is dirty and has mildew.

Yikes! Chances are high that you’ll hightail it out of the house faster than the real estate agent can say “Welcome!”

The importance of having your home repainted even before you have it listed on the market, gives off the impression that you care for your home enough that you would give it some cosmetic improvements before selling it.

2. Paint protects your walls

cost effective house painting

Queensland climate is notoriously harsh on house walls and their paint. The tropical sun can cause paint to fade prematurely, as well as blister and peel after prolonged exposure. 

Combine high temperatures with high humidity and frequent rains, and you have the perfect blend for the formation of mould and mildew.

Proper surface preparation and a fresh coat of paint not only make your property more inviting but can also protect your walls from mould and mildew. And if you’re selling a Queenslander, a coat of paint can prolong the lifespan of your timber cladding by protecting them from termites and other insects. 

3. Paint is a cost-effective way to make a home more inviting

You don’t need to renovate your entire home just to improve it. Having it repainted is an affordable way to improve its ambience and make it more attractive to any buyer who visits your home.

In Toowoomba, we specialise in providing both services!

Not only can we paint your home ready for market but we can then list it Immediately! “Your housing needs deserve the care of a specialist”

Tips For Choosing Exterior Paint Colours

Choosing the right exterior paint colours for your home can be tough but at Paintway, we aim to make the process less challenging. We have been painting Toowoomba homes for over 30 years, so we’ve seen what works and what doesn’t when it comes to colour. As a local painting business, we’re aware of the huge difference the right exterior paint colours can make to your home’s street appeal. We also know the worry (and sometimes family disagreements!) choosing colours can cause.

So is there a way to get your exterior paint colours right? The answer is YES. We have assisted many customers to achieve a result they love and add value to their homes. We offer free colour consultations with full repaints, but if you’d like some insight now, here are 5 tips to help you get started on exterior paint colours for your home.

1. Identify the style of the neighbourhood

Use the style of surrounding homes in your neighbourhood as a starting point to choose the right exterior paint colours. If traditional Queenslanders dominate the area, it’s safer to go for a more traditional scheme. If the neighbourhood contains more modern homes, bolder colours or accents may work well. Choose colours that complement (not clash with) your neighbours’ homes but are not exactly the same so you subtly set your house apart from theirs.

Exterior paint colours in Brisbane neighbourhood

Neutrals and grey-toned pastels suit traditional neighbourhoods

2. Trust nature’s colour combinations

The surrounding landscape can give clues about what paint colours will look good on your home. Is it predominantly cool green with sandy neutrals or more warm earthy tones? Are you surrounded by vibrant tropical foliage or in a more urban area? Taking your queue from nature will generally lead you in the right direction for choosing the best exterior paint colours.

Exterior paint colours - earthy

Natural and earth-toned colours look great against native plants and foliage

3. Look to your home’s features for guidance

The existing colours in or outside of a home, such as the foundation or the roof should influence your choice of exterior paint colours. Don’t go for a trendy colour that doesn’t complement what’s already there. For example, if your home has a red roof, choose warm neutrals (not cool grey-toned ones) to complement it. If you have a Queenslander with beautiful decorative features, highlight them with a contrasting darker or lighter colour.

Exterior paint colours - tip - match your roof

Creamy whites with warm dark accent colours complement and balance this home’s red roof

4. Offset dark with light exterior paint colours

Dark colours make a bold modern statement but too much exterior dark paint can make a home look small and gloomy. On traditional homes especially, make sure to offset dark hues with whites on trims, verandahs and other accents. Light colours typically make a house look larger. However, if you are you are on or near a busy main road and have pollution to deal with, you’ll need to consider practicalities – white will not be the best choice!

Exterior paint colours tip - black charcoal with white

White horizontal and diagonal accents add interest and make this home look bigger

5. Observe exterior paint colours in different lights

Light can play a big role in choosing the right exterior paint colours. How will the colours you choose look in bright sun versus a cloudy day? You should also consider which direction your home faces. If it’s west facing, colours will look brighter and more intense. Bright white would be too glary, but a light colour generally will reflect heat and last longer than dark, heat-absorbing colours.

Exterior paint colours tip - western aspect

A light neutral will work better than all-white if your home faces west and gets a lot of direct sun

Steps To Choose Exterior Paint Colours For Your Home

When you engage us, our Step-by-Step approach to colour decision-making will ensure you get the result you envision.

  • Step 1 Take advantage of our practical guidance when one of our master painters comes to your house to quote. Advice at this early stage can help you understand which colours will handle any heat, sun, or pollution that your house may be subject to.
  • Step 2 Once you engage us for a full interior or exterior repaint, we’ll arrange a free professional colour consultation for you. There’s no substitute for an onsite visit by a qualified colour professional to advise on exterior paint colours for your home in person.
  • Step 3 Finally, make sure to buy sample pots and apply samples of paint on different parts of your home. This is a crucial step that should not be skipped. You need to know how a colour will look over different base materials (eg weatherboards, woodwork or render) and in different lights to confirm your choice. We’re happy to assist with this if needed and guide you through final decisions on shades and finishes.

We’ve found this process delivers beautiful results every time. So if you’d like to begin the process of choosing your perfect colour scheme, contact Paintway Toowoomba Today!

Do you have a problem with flaky or cracked ceilings? Read on…..

Problem Ceilings? (Peeling and Flaking Paint)
The common theme in the above reasons for problem ceilings is PREPARATION, wrong application and the ceilings history.  Due to these reasons it is hard for the painting of a ceiling to be done at time.  However, no matter how much preparation occurs if the history of the ceiling is problematic it is difficult to treat with a simple paint application.

Movement happens with all homes every 10 years or so…causing joins and cracks to also appear.

The most common problem area when it comes to painting is the ceiling. Especially in Bathrooms because of Moisture! Or where we are based here in Toowoomba in the Mountains there can be months of high moisture from being in the Clouds.

There are several problems that can occur on a ceiling to categorise it as a problem area:

Calcimine Paint

Fibrous plaster ceilings were originally being painted with calcimine paint.  Calcimine paint came in powdered form.  It was mixed with water then applied to the ceiling.  Once it dried by the water evaporating it left a coat of pigment powder on the surface of the ceiling.  Years later the ceiling would have been recoated using a flat plastic paint which resulted in the calcimine pigments and powders sucking all the binders out of the new plastic paint making them unstable.  Over the years with extra coats being applied to the surface creating extra pressure as well as gravity doing its job causes the paint to flake.

Incorrect application

In the early 80s where gyprock homes were being built to price and with little knowledge of paints the incorrect application was being used.  Painters were applying flat paints straight onto bare gyprock and therefore, the paint was not soaking in like a primer would usually do.  This application process becomes unstable over the years as well as more coats being applied over time creating more pressure on the surface and gravity doing its job the result is a problem ceiling which peels and flakes.

Moisture

One of the more common issues with problem ceilings is moisture.  There are several reasons why moisture occurs.  Moisture from storm damage can release the coating from any ceiling surface causing peeling or blistering paint.  Also wet areas in the house such as the kitchen, laundry and bathroom can create moisture. For example in a bathroom with lack of ventilation, steam damage can occur to the coating causing it to flake and peel.  Using paint with a higher sheen level may help reduce water absorption which accelerates peeling ceilings.

Style of home

Queensland style homes most commonly have VJ timber ceilings.  When flaking occurs on these types of ceilings it is usually due to new acrylic paint being applied over old enamel paint.  This occurs because acrylic paint is flexible by nature and the enamel coating is rigid.  Therefore over time due to changes in temperature  the different paint properties work against each other resulting in the top layer delaminating. To solve this issue the acrylic coating needs to be completely removed followed by using a general purpose undercoat to stabilise the surface before recoating.


Autumn has Arrived 2023

Fashion and homewares trends come and go, and so do house paint colours. Thankfully, it’s almost as easy to refresh your walls as it is your wardrobe (skinny jeans are out, by the way).
Updating your interior paint colours can overhaul your mood,  this very purpose can help us to re-energise and feel warm and cosy this Autumn.
“When we talk about design and colour, we’re talking about how it feels — not just how it looks. “When we’re at home it’s important to feel the best you can.”
“Colour is coming back into homes and Aussies should feel empowered to move away from pure white walls –

As we enter the cooler months, now is the perfect time to update your home and embrace the colours of the season. This autumn, we can expect to see a combination of warm neutrals that help to create the cocooning atmosphere we crave in our homes as the seasons change.

Wrap the room

To move away from all-white ceilings, consider running your chosen wall colour onto the ceiling to create a truly enveloping feeling. For this living room, we painted the main walls and ceiling in Beaten Track paired with the slightly earthier Stilted Stalks on the fireplace wall to make it a clear focal point

Use tonal colours: Selecting two warm earthy colours and running them from floor to ceiling, as illustrated here, wraps the room in warmth.

When planning your autumn design update, look for ways to highlight your home’s unique characteristics and embrace your natural surroundings.

Adding a deep hue can be a fast and effective way to accentuate existing architectural features, like how we have opted for the rich, warm mid-tone Brown & Neutrals on the opening that leads to the home’s main entrance.

How to Paint a Front Door

If you’re looking for simple ways to beautify the front of your house while also protecting it, painting your front door should be at the top of your list. Whether for resale or for your own enjoyment, a newly painted front door boosts curb appeal and gives the whole house a fresh look. Because front doors bear the brunt of weather extremes, painting the door increases its durability and extends its lifespan.

Basics of Painting a Front Door

Nearly any front door that is made of wood, fibreglass, or steel can be painted. Many exterior front doors are sold unpainted and otherwise unfinished, with the expectation that the owner will paint it. Front doors with peeling, cracking paint can usually be successfully refurbished and re-painted.

Prep Work

The key to an attractive, long-lasting paint job is to thoroughly prepare the door. The door should be cleaned, sanded, patched where needed, primed, and then painted. Painting over peeling paint, dirt, dust, or cracks and holes will significantly reduce the paint job’s lifespan.

Removing the Door

Ensure a great front door paint job by removing the door from the hinges and painting it flat on sawhorses. Painting the door horizontally reduces drips. Additionally, removing the door gives you access to the hinge-side and bottom edges of the door.

Front Door Paint

Oil-based paints take longer to dry than water-based latex paints, stretching this from a one-day to a multi-day project. Plus, oil-based paints and related tools must be cleaned up with paint thinner or mineral spirits. However, oil-based paints are more durable than water-based paints and help to reduce brush marks.

Water-based latex paints are easy to work with and they easily clean up with water. Unlike oil-based paints, latex paints can be found in low- or no-VOC form, making them green and eco-friendly.

Semi-gloss or glossy paint sheens offer better clean ability. If you value the look of flat or matte paint for a more contemporary look, just know that they scuff more readily than glossy paints. For flat/matte doors, it helps to have a can of paint on hand for quick spot touch-ups.

When to Paint Your Front Door?

Schedule your painting project during warm, dry weather since your house will be open and exposed. Start early in the day since you need to lay down a second coat of paint before re-installing the door.

If you want to replace the door the same day, paint the exterior side and the four edges first. Then, if you run out of time to paint the inside of the door horizontally, paint it after it has been re-hung.

Should I use Primer before I paint?

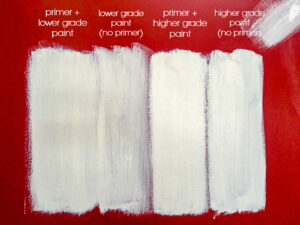
Using a primer before you paint is a great way to improve the quality of your paint job. You don’t need to prime your surface in all situations, but used properly, a primer can make all the difference.

When You Should Use a Primer?

Priming before you paint isn’t always necessary, although there are occasions when priming your surface can help you achieve a perfect, professional finish.

Here’s when you should prime before you paint:

  • Your walls are brand new. All new plasterboard needs to be sealed with a primer before it is painted.
  • If your existing paint job is dry and chalky. Paint becomes chalky as it begins to breakdown. In this case, you’ll need to wash the walls thoroughly, and apply a suitable primer to create a smooth surface for the new paint to adhere to.
  • If you are painting over oil based paint with acrylic paint. Acrylic paint won’t adhere properly to oil based paint unless an acrylic primer is used.
  • If you have mended cracks or holes. New plasterboard  should be sealed with a primer.If you walls are currently dark, and you want to paint them a light colour. The primer will help cover up the dark hue, so your new, light paint will show up brighter.

The Benefits of Using a Primer….

Painting a primer on your surface is a simple way to improve the finish of your paint job, and make it last longer. In most situations you can achieve better results with one coat of primer and one coat of paint, rather than two coats of paint.

Here are few benefits of priming your walls before you paint:

Priming will ensure your colour is rich and vibrant. Primers can hide the colour you are painting over – even dark reds and blues – so the old colour doesn’t alter the new colour.
Priming will create the ideal surface for paint to adhere to. While paints are rich in pigment, primers are rich in resin. This means paint can cling to primer more effectively than old paint. Primer also evens out your surface, so you can achieve a consistent finish.
Primers can prevent stains. Primers seal the surface, and therefore block out stains so they can’t ruin your paint job.
Primers can increase the longevity of your paint. Primers can help prevent peeling, cracking and blistering. They will also ensure the paint colour doesn’t fade.

Common House Painting Mistakes

A Mistake Can Always be Corrected!

Do-it-yourself painting can be a way to save money on house painting. But you need to do your homework first. As you want the end result to look like a professional house painters job. Painting is a great way to give your home a face-uplift, and DIY painting is one way to achieve this. We always see the same common mistakes people make when undertaking the house painting themselves.

Most of these mistakes people make during the painting process are avoidable; all you need to do is to pay attention to the small details before starting the paint job and during the painting process.

Below find the DIY mistakes outlined by our experienced painters; they will help in your next DIY paint project.

1. Avoid Choosing the Wrong Colour

Did you know that most of the common painting mistakes happen before you start painting? One of them is picking the wrong colour; it is advisable to choose a paint colour based on a colour swatch. Most clients get frustrated when looking for the best colour. You visit the store and buy your preferred colour, but the final look differs from the colour you initially picked. Light plays a major part when looking at colours!

Always ask the paint store for a mix of the sample paint, take it home, and try it out. Paint experts will advise that you observe it in both artificial and natural light.

2. Over-brushing is not a Good Idea

When undertaking your interior painting on cabinets, doors, or any other woodwork, avoid too much brushwork. This strategy will help achieve the smoothest possible finish. After loading your brush, immediately cover the area with paint. After that, apply one or two strokes to level it off. Avoid brushing the same spot when the paint starts to dry off. That will only cause brush marks and ridges.

3. Extreme Temperatures 

Extreme temperatures like Queensland summers or Melbournes winters are not the right atmosphere for any paint job. Avoid any exterior painting during the heat of the day or conversely a cold morning.

Painting on a hot surface is not a good idea; the paint will dry faster before spreading it evenly. Sometimes the colour can slough and bubble off. Always avoid the direct sun when painting and know the best time to paint your home.

4. Cover Everything before Spray Painting

When you decide on DIY, never underestimate the power of sprays from paint sprays and spray cans. Always cover everything with thin plastic. In case you are working outdoors, avoid spraying on a windy day. The spray may end up on the neighbour’s property. 

Keep your Furniture Covered!

5. Surface Prep

Before you start your DIY paint job, it is crucial to prepare your walls or ceilings. Remember to remove any flaking and peelings surfaces. Scrape any glossy surfaces before applying a fresh coat of paint. It ensures that you end up with an evenly painted surface. Avoid the mistake of painting on unprepared surfaces, and the result will be an uneven paint job.

6. Do not Use the Wrong Finish

When you choose the wrong paint sheen or gloss for your DIY, it will not deliver professional work no matter how good you are. Below are some tips to help avoid that:

When the surfaces are not perfect, avoid using any high sheen. That glossiness will only maximize the problem, and light-reflecting will bring out all the defects. In case you decide to use gloss sheen or semi-gloss, ensure that the surface is well prepared and smooth enough.

If you are using different sheens and the same colour, always label your cans. It will make your DIY easier and avoid any mistakes until the paint dries.

7. Avoid Rookie Mistakes

There are two common mistakes that rookie DIY make:

Leaving the lid off after opening the paint can; the main problem is that anyone can step on the lid and spill paint all over. The other reason to avoid leaving the lid off is to keep the paint clean and prevent it from drying out. You will prevent mixing colours up.

Always lock your pets; if you forget to, they may end knocking the paint cans or putting paintbrushes in their mouth. It is the best trick for any DIY project.

8. Avoiding having your Roller Touch the Floor

In case you are painting new walls before installing the skirting, always leave an unpainted strip that the skirting will cover. When you paint close to the floor, the roller might pick some dirt and spread it across the wall. When painting over any ceiling, test a small section. If the texture looks fine, you can continue with the painting on the whole ceiling.

9. Wash Your Brushes 

After the DIY project, you will be exhausted, do not leave the brushes in the garage to clean them later; it is a bad idea. Protect your tools by washing the brushes immediately with water and dish detergent. Ensure you wrap the brushes in airtight aluminium foil or plastic wrap. After cleaning, store them in the original packaging to maintain their shape.

Paintways 7 Simple Steps to Calculate the Amount of Paint Needed for your Painting Project


calculatepaint-jpeg


When wanting to repaint your home, there are a number of things to work out first before that brush ever touches the paint. Once you have found the perfect colour for your living room, the next step in the process is to find what the best paint to use is and how much you will need. Calculating the amount of paint you will need doesn’t have to be difficult, and Paintway’s guide  will be able to easily figure out how much you need.

1. Measure up your room

The first thing to do to determine how much paint you will need for your project is to measure all of the walls you want to paint. This is done with a simple calculation to help you quickly find the average amount of paint in litres for a single coat of paint. You will need to measure the surface area of your room, discounting the ceiling and the floor. To do this you should measure all of the walls in your home from ceiling to floor and wall to walls. Add the measurements of the width of your walls multiply them by the height of the room to determine the square metre size of your room.

2. Take into account windows and doors

When measuring the surface area of your room, you may not be painting the ceiling or the windows and the doors, so you need to determine the size of these surface areas and discount them from your calculation. With your square metre number, simply subtract roughly 1.85 square metres from your calculations for your doors, and perform the square metre measurement for your windows to find their size. Simply remove this number from your initial calculation to determine the surface area of your room.

3. Buying the right amount of paint

With your calculation determining the surface area of your room, you are now ready to purchase the right amount of paint – but wait there, it all still depends on how many coats you want to give the walls, as well as the viscosity and type of paint you want to use. On average, a 4 litre bucket of paint will allow you to paint roughly 32 square metres of wall for a single coat.

4. Number of coats
Whilst many people simply paint over the previous colour until it is no longer visible, the best painting services paint has to offer often like to add a primer coat in order to blank the previous pant, as well as paint a tint layer to bring the vibrant colours to life for a more professional look and feel. You will need to calculate how many coats you will need for each room, so test out your walls with a tester pot of the paint of your choice to see how it holds and finishes before purchasing more.

5. Finalising your calculations

When you have determined how many coats of paint you want to put on your walls, and the surface area of your rooms, you will need to divide the paintable surface area of your room by the square metre capacity of a 5 litre tub of paint. If your paint comes in smaller or larger sizes, use this number to determine how many tubs or tins of paint you will require to finish the job properly. If you find that you are short by a little, order a few small tins to make up the difference, but if you find that you will need more, then go for the extra big tub to make sure you can finish with a little spillage into the equation.

6. Using a paint calculator

Using an online paint calculator can be a simple way of quickly getting the amount of paint you will need for the room to be painted. Taking rough guesses is a good way to determine roughly the cost of your painting project, but getting the precise figure is the best way of making sure that you don’t go over budget, or come up short when that special paint you bought at a discount is no longer available.

7. Paint your walls

Painting your walls accordingly will be the best part of your final calculation and will make all of the hard work worth it in the end.

If you are in any doubt about the calculations and price involved in high quality paint, or the types of paint you will need for your particular rooms finishes, don’t hesitate to call Paintway, who will be able to talk you through the process, and give you a solid estimate on the final price for the job done.