
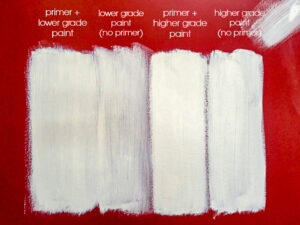
Should I use Primer before I paint?


Using a primer before you paint is a great way to improve the quality of your paint job. You don’t need to prime your surface in all situations, but used properly, a primer can make all the difference.

When You Should Use a Primer?

Priming before you paint isn’t always necessary, although there are occasions when priming your surface can help you achieve a perfect, professional finish.

Here’s when you should prime before you paint:

  • Your walls are brand new. All new plasterboard needs to be sealed with a primer before it is painted.
  • If your existing paint job is dry and chalky. Paint becomes chalky as it begins to breakdown. In this case, you’ll need to wash the walls thoroughly, and apply a suitable primer to create a smooth surface for the new paint to adhere to.
  • If you are painting over oil based paint with acrylic paint. Acrylic paint won’t adhere properly to oil based paint unless an acrylic primer is used.
  • If you have mended cracks or holes. New plasterboard  should be sealed with a primer.If you walls are currently dark, and you want to paint them a light colour. The primer will help cover up the dark hue, so your new, light paint will show up brighter.

The Benefits of Using a Primer….

Painting a primer on your surface is a simple way to improve the finish of your paint job, and make it last longer. In most situations you can achieve better results with one coat of primer and one coat of paint, rather than two coats of paint.

Here are few benefits of priming your walls before you paint:

Priming will ensure your colour is rich and vibrant. Primers can hide the colour you are painting over – even dark reds and blues – so the old colour doesn’t alter the new colour.
Priming will create the ideal surface for paint to adhere to. While paints are rich in pigment, primers are rich in resin. This means paint can cling to primer more effectively than old paint. Primer also evens out your surface, so you can achieve a consistent finish.
Primers can prevent stains. Primers seal the surface, and therefore block out stains so they can’t ruin your paint job.
Primers can increase the longevity of your paint. Primers can help prevent peeling, cracking and blistering. They will also ensure the paint colour doesn’t fade.


Use psychology to colour your home……

Use psychology to colour your home

Colour choice is a big step when you’re redecorating. No matter which room – be it a home office, children’s bedroom or ensuite bathroom – the colour is going impact how that space feels in more ways than one.

As you may know, colour plays an important role in the physical make up of your project. It highlights specific features, creates bold lines and shadows or flattens the ceiling and walls to create a sense of space. However, it also has psychological aspects to it. Here is a run down on how different hues can change the way you feel about a room.

Red images

Red is a strong, passionate colour and can have quite drastic uplifting effects on the occupants of a red-inspired space. According to colour psychologists, red helps bring people together in a room and instigates conversation.

Hues like Sensual Red and Shiraz both bring out the energy in people, and create a powerful first impression around an entranceway. Some consider it too much for a bedroom, though that being said, its high adrenalin may still be for you. If you want red in a bedroom without going overboard, try using it on the wall behind the bed. That way you’ll get to enjoy it while you are moving around the room, but if you’re sick in bed you won’t have it keeping you awake.

Blue images-2


Entirely the opposite of its red counterpart, blue acts as a peacemaker and is a calming colour to be amongst. In fact, anyone who talks to you about feng shui will discuss how serene and freeing the colour can be. However, the choice of blue is important because the wrong tone can create negative emotions, rather than calming ones.

For example, pastel blues can make a room appear cold and very dark blues can invoke a sense of sadness. Don’t avoid the colour, however, instead just focus more on mid-tones like Navy Blue or Periglacial Blue then scatter some warmer features to accompany.

Green images-3

Though the mere mention of green might turn some of you away, don’t discount the colour just yet. According to feng shui, green is the ancient colour of movement and nature. It is a pleasant colour to look at and has a calming effect as well, thanks to it being a combination if blue and yellow.

Used in a study, office, library or other place of work it will help stimulate restful minds within the occupants, hopefully making them a little less distracted. If you’re worried about the look of a luminous lime green, consider something more along the lines of Citrone Green, Sushi Green, or use in small doses.

White images-4

White and off-white are great for almost any room, and instantly brighten it up and disperse hard lines and shadows, offering a sense of space and happiness.

Whites like Merino or Half SoapStone symbolise purity, cleanliness and air, which is why they’re so good for small apartments, cramped houses and bathrooms. Covering the entire space, however, gives some people the idea of a sterile space – maybe because hospitals and such are predominantly bright colours. White can, however, be used to effectively uplift highlights and accents instead.

Greys/Blacks images

As a primary colour, greys and blacks don’t always work so well by themselves, as they can give off all of the wrong impressions. For example, black instantly darkens a room as it absorbs colour, and the wrong use of grey can give the impression of fear and restraint. Used to highlight, feature or accent, however, these neutral colours are perfect.

Set against a bright backdrop, such as white, black stands out perfectly and gives a sense of elegance. Grey can have a similar impact, too, though on a more subtle level. In your spaces, try defining with Delta Grey, Fuscous Grey  or Grey Triple Mondo.

Hope you enjoyed Reading about these tips to help choose your colour for your home.


Quick KEY Tips to Paint Your Home…..Follow some of these simple D.I.Y tips

1. Slosh Your Brush   Quick KEY Tips to Paint Your Home

Before painting, slosh your brush in whatever solvent you will be using at the end of the day to clean the brush (i.e., water for latex, mineral spirits for oil, etc.) It’ll be easier to clean when you’re done.

2. Wrap Brush or Roller

If you don’t feel like cleaning your brush or roller at the end of the day and expect to get back to painting within a few days–

3. Latex Gloves or Lotion, Your Pick

Latex gloves are great for keeping your hands clean (especially if you’re using oil-based paint!). If you can’t stand latex gloves or are allergic, a thick application of hand lotion before painting will make cleaning a lot easier later on.

4. Wet Edge

Always keep a wet edge as you paint, and work away from that wet edge. If you paint over a dry edge, you will get overlap marks.

5. Avoid Cheap Roller Covers and Brushes

This one is important. Cheap roller covers leave fuzz on the wall. Cheap brushes leave streaky brush marks. Avoid those multi-packs of rollers, ten for a dollar. Pay the extra few cents and get better tools. It’ll be worth it. Honest it will.

6. Test for Loose Paint

Will the existing painted surface take new paint? And hold it for years to come? Test this out by adhering a strip of duct tape to the existing painted surface and…ripping it away. If flakes of paint more than microscopic size come off, you may need to scrape and sand

7. Low-Stick Masking Tape

Also known as “blue tape,” this tape comes off easier and doesn’t peel off primer or existing paint. Blue tape, by itself, will save you at least an hour of frustration over the old-style beige masking tape.

8. Rein in Your Paint Can Opener

Paint can openers, those little metal keys (you do use one, don’t you?) are notorious for getting lost in the shuffle. Chain it to a small chunk of wood just like a public bathroom key. Whatever you do, just don’t lose it!

9. Painting Process

Paint in this order:
Ceiling
Walls
Trim
Cabinets
Doors
And remember to always paint from top-down!

How to paint the exterior of your home?

Thought about doing it yourself?

Paintway are giving you a few tips to help you get started.

How to Paint a House Exterior.

Before you begin your exterior house painting project, keep these steps in mind.

Preparing to Paint.

First, remove as many items as you can (planters, mailboxes, shutters, house numbers, hoses, outdoor furniture, light fixtures, etc.). Then be sure to protect any bushes or items that can’t be removed by covering them up with drop cloths. You can also put drop cloths under the areas you plan to paint. Next, be sure to clean (an option is to power wash), repair (fill in holes or cracks with caulk), and prime all surfaces before painting your house’s exterior.

Once the primer coat has dried and all your preparations are complete, you’re ready to paint. Remember to mix your paint thoroughly before you start painting–and continue to stir it during use. Start with the Body of the House (“Fascia”)

When tackling your exterior house painting project, you can paint with either a brush, a roller or, most likely, both. Rolling can save you time, but you will need to use a brush for corners, trim, and doors.

Painting with a Brush.

To load your paintbrush, immerse the first third of the bristles into the paint and tap it lightly against the inside of the can. Try not to drag the bristles across the lip of the can, as this will remove too much paint.

When you apply paint, use long, smooth strokes with your brush. On clapboard surfaces, if paint gathers along the horizontal edge, it has been applied too heavily or not brushed out enough. Remember that for a well-spread, even coat, you should brush oil-based house paints back and forth several times.

Latex paints, however, require less brushing. Because they dry out quickly, excessive brushing can cut deep brush marks into the paint film. When you use latex paints, apply the paint generously with one or two back strokes and then leave it to dry.

.Painting with a Roller.

Applying paint with a roller works well with porous surfaces like masonry and stucco. Ideal for flat surfaces, rollers will not fit into inside corners, and will often deposit too much paint on the edges of outer corners.

To use a paint roller, dip your roller in the paint tray, rolling it back and forth to remove any excess paint. If it drips when you pick it up, it is overloaded. Use long, even strokes, and roll in different directions to coat the entire surface. Finish painting with strokes in one direction.

Painting Trim.

The trim should be the last area you paint. Begin by coating your window sash and door paneling first, and then paint the window frames, sills, and door trim.

If paint gets on the window’s putty line, it will serve to protect the puttied surface from water. To create a clean edge, scrape off any excess paint with a razor blade. If shutters can be removed, paint them separately and replace them when the rest of the job is finished. Then it’s time to admire your work!

paintway coloured            wpaintway2019.au3.live-preview.net