Undercoat and Primer are key components in the Painting process. It is imperative that they are done and must be considered when painting your home.Whether your painting a small internal or a large external project, understanding how to use Undercoat and Primer will influence the finish of your project dramatically.
Paintway give you a a brief run down on what Undercoat and Primer are and how to use both materials in your next painting project.
A primer or undercoat is a preparatory coating put on materials before painting. Priming ensures better adhesion of paint to the surface, increases paint durability, and provides additional protection for the material being painted.
Prepcoats prepare the surface to be painted with a topcoat. Primers, on the other hand, adhere to timber surfaces and contain stain inhibiting tannin blockers, while an undercoat is ideal for preparing plasterboard.
Acrylic Primer: used to seal bare areas before painting the finish coats. For example bare plasterboard walls or ceilings.
Oil Primer/Undercoat: used as a binding coat between glossy surfaces such as windows, doors, frames and skirting and your finish coats. Most paint jobs older than 4 years would generally have been painted in enamel paints. For example repainting Enamel surfaces or bare hardwood.
Water based Undercoats: there are a few manufacturers that make a water based undercoat. Its best to talk to them and doing a test sample to check if it sticks. The key to these water based products sticking to enamel, is thorough preparation.
Note: if you want to check if you have enamel surfaces – get some methylated spirits and use a old rag and rub done the area to be tested. If the paint comes off its acrylic – if not its enamel. Be careful not to mistake paint rubbing off with old dirt.
If already have enamel painted surfaces and you have used the appropriate primer or undercoat you now have the option to convert from enamel to water based top-coat. The advantages are they are less smelly (low odour) and easier clean up paint – they are usually referred to as Acrylic Enamel. Not only are they easy to use you can wash up in water.
How much Paint do i need to Paint my House?
When planning a painting project, knowing exactly how much paint you’ll need will save you a trip back to the paint store because you haven’t bought enough, or you find you’ve purchased way too much.
So how do you calculate how many litres of paint you will need?
Follow these simple steps to work out the formula:
👉 Calculate the surface area of your project by multiplying the length x height. If you have doors and windows in the area, simply measure the separate areas and subtract that number from your surface area.
👉 How many coats of paint will you need?
👉 Find out what your paint’s ‘spread rate’ or ‘theoretical coverage’ is by referencing the technical specifications of the paint or ask one of our friendly team members.
👉 Then you can go ahead and calculate the answer using this formula:
Surface Area ÷ Spread Rate x Number of Coats = Total Litres of Paint.
There are lots of factors when working out how much paint is required. Experience gives the best knowledge as different surfaces may or may not be more porous. Application tends to pay a part too, the most common use is a roller and quite often people don’t roll out all the paint therefore lots gets left in the fibres especially when using a longer Nap.
How to Paint a Front Door
If you’re looking for simple ways to beautify the front of your house while also protecting it, painting your front door should be at the top of your list. Whether for resale or for your own enjoyment, a newly painted front door boosts curb appeal and gives the whole house a fresh look. Because front doors bear the brunt of weather extremes, painting the door increases its durability and extends its lifespan.
Basics of Painting a Front Door
Nearly any front door that is made of wood, fibreglass, or steel can be painted. Many exterior front doors are sold unpainted and otherwise unfinished, with the expectation that the owner will paint it. Front doors with peeling, cracking paint can usually be successfully refurbished and re-painted.
Prep Work
The key to an attractive, long-lasting paint job is to thoroughly prepare the door. The door should be cleaned, sanded, patched where needed, primed, and then painted. Painting over peeling paint, dirt, dust, or cracks and holes will significantly reduce the paint job’s lifespan.
Removing the Door
Ensure a great front door paint job by removing the door from the hinges and painting it flat on sawhorses. Painting the door horizontally reduces drips. Additionally, removing the door gives you access to the hinge-side and bottom edges of the door.
Front Door Paint
Oil-based paints take longer to dry than water-based latex paints, stretching this from a one-day to a multi-day project. Plus, oil-based paints and related tools must be cleaned up with paint thinner or mineral spirits. However, oil-based paints are more durable than water-based paints and help to reduce brush marks.
Water-based latex paints are easy to work with and they easily clean up with water. Unlike oil-based paints, latex paints can be found in low- or no-VOC form, making them green and eco-friendly.
Semi-gloss or glossy paint sheens offer better clean ability. If you value the look of flat or matte paint for a more contemporary look, just know that they scuff more readily than glossy paints. For flat/matte doors, it helps to have a can of paint on hand for quick spot touch-ups.
When to Paint Your Front Door?
Schedule your painting project during warm, dry weather since your house will be open and exposed. Start early in the day since you need to lay down a second coat of paint before re-installing the door.
If you want to replace the door the same day, paint the exterior side and the four edges first. Then, if you run out of time to paint the inside of the door horizontally, paint it after it has been re-hung.
Should I use Primer before I paint?
Using a primer before you paint is a great way to improve the quality of your paint job. You don’t need to prime your surface in all situations, but used properly, a primer can make all the difference.
When You Should Use a Primer?
Priming before you paint isn’t always necessary, although there are occasions when priming your surface can help you achieve a perfect, professional finish.
Here’s when you should prime before you paint:
Your walls are brand new. All new plasterboard needs to be sealed with a primer before it is painted.
If your existing paint job is dry and chalky. Paint becomes chalky as it begins to breakdown. In this case, you’ll need to wash the walls thoroughly, and apply a suitable primer to create a smooth surface for the new paint to adhere to.
If you are painting over oil based paint with acrylic paint. Acrylic paint won’t adhere properly to oil based paint unless an acrylic primer is used.
If you have mended cracks or holes. New plasterboard should be sealed with a primer.If you walls are currently dark, and you want to paint them a light colour. The primer will help cover up the dark hue, so your new, light paint will show up brighter.
The Benefits of Using a Primer….
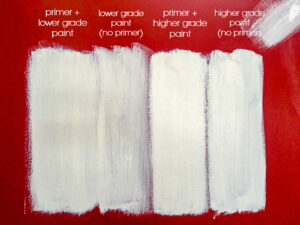
Painting a primer on your surface is a simple way to improve the finish of your paint job, and make it last longer. In most situations you can achieve better results with one coat of primer and one coat of paint, rather than two coats of paint.
Here are few benefits of priming your walls before you paint:
Priming will ensure your colour is rich and vibrant. Primers can hide the colour you are painting over – even dark reds and blues – so the old colour doesn’t alter the new colour.
Priming will create the ideal surface for paint to adhere to. While paints are rich in pigment, primers are rich in resin. This means paint can cling to primer more effectively than old paint. Primer also evens out your surface, so you can achieve a consistent finish.
Primers can prevent stains. Primers seal the surface, and therefore block out stains so they can’t ruin your paint job.
Primers can increase the longevity of your paint. Primers can help prevent peeling, cracking and blistering. They will also ensure the paint colour doesn’t fade.
Common House Painting Mistakes
A Mistake Can Always be Corrected!
Do-it-yourself painting can be a way to save money on house painting. But you need to do your homework first. As you want the end result to look like a professional house painters job. Painting is a great way to give your home a face-uplift, and DIY painting is one way to achieve this. We always see the same common mistakes people make when undertaking the house painting themselves.
Most of these mistakes people make during the painting process are avoidable; all you need to do is to pay attention to the small details before starting the paint job and during the painting process.
Below find the DIY mistakes outlined by our experienced painters; they will help in your next DIY paint project.
1. Avoid Choosing the Wrong Colour
Did you know that most of the common painting mistakes happen before you start painting? One of them is picking the wrong colour; it is advisable to choose a paint colour based on a colour swatch. Most clients get frustrated when looking for thebest colour. You visit the store and buy your preferred colour, but the final look differs from the colour you initially picked. Light plays a major part when looking at colours!
Always ask the paint store for a mix of the sample paint, take it home, and try it out. Paint experts will advise that you observe it in both artificial and natural light.
2. Over-brushing is not a Good Idea
When undertaking your interior painting on cabinets, doors, or any other woodwork, avoid too much brushwork. This strategy will help achieve the smoothest possible finish. After loading your brush, immediately cover the area with paint. After that, apply one or two strokes to level it off. Avoid brushing the same spot when the paint starts to dry off. That will only cause brush marks and ridges.
3. Extreme Temperatures
Extreme temperatures like Queensland summers or Melbournes winters are not the right atmosphere for any paint job. Avoid any exterior painting during the heat of the day or conversely a cold morning.
Painting on a hot surface is not a good idea; the paint will dry faster before spreading it evenly. Sometimes the colour can slough and bubble off. Always avoid the direct sun when painting and know the best time to paint your home.
4. Cover Everything before Spray Painting
When you decide on DIY, never underestimate the power of sprays from paint sprays and spray cans. Always cover everything with thin plastic. In case you are working outdoors, avoid spraying on a windy day. The spray may end up on the neighbour’s property.
Keep your Furniture Covered!
5. Surface Prep
Before you start your DIY paint job, it is crucial to prepare your walls or ceilings. Remember to remove any flaking and peelings surfaces. Scrape any glossy surfaces before applying a fresh coat of paint. It ensures that you end up with an evenly painted surface. Avoid the mistake of painting on unprepared surfaces, and the result will be an uneven paint job.
6. Do not Use the Wrong Finish
When you choose the wrong paint sheen or gloss for your DIY, it will not deliver professional work no matter how good you are. Below are some tips to help avoid that:
When the surfaces are not perfect, avoid using any high sheen. That glossiness will only maximize the problem, and light-reflecting will bring out all the defects. In case you decide to use gloss sheen or semi-gloss, ensure that the surface is well prepared and smooth enough.
If you are using different sheens and the same colour, always label your cans. It will make your DIY easier and avoid any mistakes until the paint dries.
7. Avoid Rookie Mistakes
There are two common mistakes that rookie DIY make:
Leaving the lid off after opening the paint can; the main problem is that anyone can step on the lid and spill paint all over. The other reason to avoid leaving the lid off is to keep the paint clean and prevent it from drying out. You will prevent mixing colours up.
Always lock your pets; if you forget to, they may end knocking the paint cans or putting paintbrushes in their mouth. It is the best trick for any DIY project.
8. Avoiding having your Roller Touch the Floor
In case you are painting new walls before installing the skirting, always leave an unpainted strip that the skirting will cover. When you paint close to the floor, the roller might pick some dirt and spread it across the wall. When painting over any ceiling, test a small section. If the texture looks fine, you can continue with the painting on the whole ceiling.
9. Wash Your Brushes
After the DIY project, you will be exhausted, do not leave the brushes in the garage to clean them later; it is a bad idea. Protect your tools by washing the brushes immediately with water and dish detergent. Ensure you wrap the brushes in airtight aluminium foil or plastic wrap. After cleaning, store them in the original packaging to maintain their shape.
Undercoat and Primer…What are they and why are they so important?
Undercoat and Primer are key components in the Painting process. It is imperative that they are done and must be considered when painting your home.
Whether your painting a small internal or a large external project, understanding how to use Undercoat and Primer will influence the finish of your project dramatically.
Paintway give you a a brief run down on what Undercoat and Primer are and how to use both materials in your next painting project.
A primer or undercoat is a preparatory coating put on materials before painting. Priming ensures better adhesion of paint to the surface, increases paint durability, and provides additional protection for the material being painted.
Prepcoats prepare the surface to be painted with a topcoat. Primers, on the other hand, adhere to timber surfaces and contain stain inhibiting tannin blockers, while an undercoat is ideal for preparing plasterboard.
Acrylic Primer: used to seal bare areas before painting the finish coats. For example bare plasterboard walls or ceilings.
Oil Primer/Undercoat: used as a binding coat between glossy surfaces such as windows, doors, frames and skirting and your finish coats. Most paint jobs older than 4 years would generally have been painted in enamel paints. For example repainting Enamel surfaces or bare hardwood.
Water based Undercoats: there are a few manufacturers that make a water based undercoat. Its best to talk to them and doing a test sample to check if it sticks. The key to these water based products sticking to enamel, is thorough preparation.
Note: if you want to check if you have enamel surfaces – get some methylated spirits and use a old rag and rub done the area to be tested. If the paint comes off its acrylic – if not its enamel. Be careful not to mistake paint rubbing off with old dirt.
If already have enamel painted surfaces and you have used the appropriate primer or undercoat you now have the option to convert from enamel to water based top-coat. The advantages are they are less smelly (low odour) and easier clean up paint – they are usually referred to as Acrylic Enamel. Not only are they easy to use you can wash up in water.
Popcorn Ceilings?How to Remove it
The 1960s and 1970s saw the rise of popcorn ceilings, easily recognisable by the rough texture. Also called vermiculite ceilings they were mainly featured in hallways and bedrooms but sometimes throughout every room of the house. Popcorn ceilings were applied through spraying or painting in a particular way. It was a popular interior design and covered up imperfections on the plaster. But in actual fact, it catches a lot of dust and was even used in conjunction with asbestos, which was widely used in the 60s and 70s. You can remove popcorn ceilings yourself but it is a big job to take on and you must test for asbestos first.
Paintway see these types of ceilings during renovations and remove them as part of our services. We understand the process and can easily remove the old popcorn texture and replace it with beautiful new modern ceilings.
Before you follow these tips there is a very important first step – to test for asbestos in the popcorn ceilings. The only safe way to do this is call in a professional. They will safely scrape a small amount for testing and if it shows asbestos then the professional asbestos teams will remove it for you.
If there is no asbestos then these are the tips to follow.
Tip 1 – Prep and Protect
Taking down popcorn ceilings is very messy work, remove all the furniture and cover any heavy furniture that can’t be moved with plastic. Tape plastic to lights switches, walls, door frames, floors and windows. Make sure it’s thick plastic drop sheets designed for these types of specific home renovations. And heavy-duty tape to keep the drop sheets in place. All of this needs to be done with great care as the wetting process during the ceiling removal can potentially cause a lot of damage. We also recommend turning off the power as obviously water and electricity do not mix.
Tip 2 – What to do with ceiling lights and fans on a popcorn ceiling
It’s also very important to protect your lights and ceiling fans from the water spray. If you have downlights then after removal of the fixture put newspaper or similar into the holes. Removing the ceiling lights and fans may be cumbersome and annoying but they will be in the way during the removal process and can easily be damaged by dust and water.
Tip 3 – What to wear when DIY popcorn ceiling
Protect yourself – get a face mask that is HEPA or of a similar protection level. This prevents the dust and materials from being inhaled into your lungs. Also, wear gloves and eye mask protection. For clothing either buy protective plastic clothing or wear long sleeves and long pants plus boots. And make sure you throw them away afterwards as it’s easier than trying to wash the dust off! As you can see all of this work is prep and the removal process has not even happened. This is one reason we often see people decide DIY removing popcorn ceilings is better left to professional painters.
Tip 4 – Wetting the ceiling
The popcorn ceiling is removed by wetting the area with warm water which breaks down the adhesive bonds. Use a spray bottle and wet one area at a time, not the whole ceiling. The water needs to soak on the surface for at least 15 minutes. Do not overspray water and use too much as this will damage the plasterboard underneath.
Tip 5 – Scraping the popcorn ceiling
The most important step of the process is scraping. As scraping is what actually removes the rough texture. Make sure you have the right tools to scrape popcorn ceilings, a large wide blade is best. Keep steady and use long motions to best remove the textured effect. For hard areas like corners and edges using a putty knife works. Use a paint pan in your other hand to catch as much of the texture that scrapes off as you can.
If you find the texture is not easily coming off then wait another 15 mins and spray a little more water then try again.
Tip 6 – Repairing the ceiling
After the scraping and texture removal then you need to repair and smooth the surface. This step must be done before any repainting otherwise it will look uneven and the paint will flake off. To repair any holes in the plaster use a joint compound. It will need 24 hours to dry before the ceiling can be sanded. Use a fine-grit sanding paper on a sanding pole. The way to sand is horizontally from one end to the other. Do not swirl the pole or apply too much pressure as this damages the ceiling. This is a very tedious process and if at this stage you have had enough, we can step and finish the process from here. We have taken on many vermiculite/popcorn ceiling renovations at this stage.
Tip 7 – Priming and painting ceilings
Now it’s finally time to paint the ceiling. Make sure you use a primer before painting and at least two coats. Buy paint that is specifically made for ceilings and take a look at some ceiling paint interior design ideas. Believe it or not, there is a lot more than white paint for ceilings!
Finally, removing popcorn ceilings with DIY methods is not easy and we recommend our professional painting service to get the best finished result. You are still going to pay costs for DIY with paint, primer, sanding tools, scraping tools etc.
How to Paint A Wall
Painting a wall in any room or space can dramatically change the look or feel.
Selecting the right colour and using a high quality interior wall paint will ensure professional looking results and a longer lasting finish.
Under an hour Allow approx 20 minutes for standard sized wall.
MATERIALS
Here’s what you’re going to need:
Interior wall paint*
Canvas drop cloths
Painter’s masking tape
Angled paint brush
Roller Frame 230 or 270mm width
9-12mm nap roller cover (matching frame width)
Paint tray (matching frame width)
* We estimate you’ll need 2L of paint to cover an average sized wall. We recommend using a low sheen paint…
STEPS
Determine the paint colour for your wall. Remember to consider colours you have selected for doors, trim and ceilings when making your choice.
Determine the quantity of paint required for the area you will be painting.
Place drop cloths on floors and on any furnishings that must remain in the room.
Apply painter’s masking tape to fittings which can’t be removed and any edges which may be fiddly and difficult to paint around, such as skirting boards and fixed shelving.
Once you’ve stirred the paint thoroughly, you’re ready to begin!
Start with the edges of the wall using a technique called cutting-in. Partially load the angled paint brush in paint and remove any excess.
Place the angled brush at the edge of the wall. Hold it like a pencil, placing some pressure on it. Begin by painting towards the top corner and working down towards the bottom.
Use smooth strokes and cut-IN to corners. Working from the corners OUT will create a build-up of paint and a less than ideal finish. Cut-in all wall edges and then move onto rolling.
Stir remaining paint in the can thoroughly before pouring into a paint tray.
Dip half the roller into the paint tray, then roll back and forth in the tray to get an even coat of paint around the roller. Tap each side of the roller on the sides of the paint tray to remove any excess paint.
Take the roller to the wall using a pole, making sure the roller is parallel to the surface.
Paint the wall using either a W or M technique, starting a roller’s width out from the edge of the wall, and rolling from mid-height towards the ceiling, and then down towards the skirting. Each time this step is completed you should have enough paint on the roller to cover about a 1 meter width of the wall
After completing half the standard wall, reapply the roller over any already painted areas, to remove excess paint and track marks for an even finish.
Repeat these steps for each 1 metre width section of the wall until the entire wall is completed.
Make sure you wait a minimum of 2 hours before painting a second coat, and remember to allow the second coat to dry completely.
A standard sized wall is approximately 4m2
We recommend safely using a step ladder and/or an extendable roller pole when painting higher walls.
Sanding Walls Before Painting Them
Sanding before painting wallsNot much sanding is typically needed unless you have dings, nail pops, or a hole. If you do, you’ll need to do some patching and then sanding prior to painting.
You might want to do a light sand with fine abrasives to remove any small imperfections and to ensure better paint adhesion.
If you do a light sand, choose an abrasive sheet that attaches easily to a hand or pole sander. If you’re spot-sanding dry mud or patching compounds, consider an abrasives sponge that resists loading. And be sure to tack off any sanding dust using a tack cloth.
Trim/moulding/cabinets/furniture
If it’s new, there won’t be much sanding required. You might want to do a light sand with fine abrasives to remove any imperfections.
If you do a light sand, be sure to tack off any sanding dust using a tack cloth.
If it’s been in place a while, you’ll need to sand out any scratches. Fill any holes with wood fillers. Then, you’ll want to sand that to smooth out the surface.(Staining wood)
Strip off any old stain.Sand down – with the grain – and rough up the entire surface to absorb new stain.
Sand – again, with the grain – between coats of polyurethane.
Always work through a sequence of abrasives grits, from coarse to very fine, skipping no more than one grit between stages.
Can you Paint Over Wallpaper?
As a general rule try not to paint over wallpaper😄
Most often, I recommend removing wallpaper, so you can start with a fresh wall, If this is not an option then there are many issues to consider before you paint over wallpaper – keeping in mind the points stated above.
If removal of the wallpaper is not an option, the first thing you want to do is to clean the surface then lightly sanded seems to make them as smooth as possible. Ultimately you want a clean dry roller and a smooth surface prior to application.
🛎 Test a quick drying latex adhesion promoting primer, there are many wallpapering Products out there – check out with your paint supplier to see the recommended system. If the primer drives without lifting and blistering, clean the surface with the paper then the surface is ready to be primed and then top coated with a good quality latex paint
🔖 note – the seams may be visible in some areas – repair those areas as needed.
📌 The seams may not lie down properly
📌Moisture from the paint could cause wrinkling blistering or peeling
📌The texture from the wallpaper on a Telegraph through causing a poor look on a solid wall
Any of these things could cause problems for those reasons We always recommend testing the system prior to taking on the entire job, a test can prevent so many issues from occurring.





 Not much sanding is typically needed unless you have dings, nail pops, or a hole. If you do, you’ll need to do some patching and then sanding prior to painting.
 You might want to do a light sand with fine abrasives to remove any small imperfections and to ensure better paint adhesion.
 )
)